How to Maintain your Vintage Back Saw
You just bought a really nice saw for somewhere north of $300 USD, and you may be wondering whether to hang it up over the fireplace for public view, or to actually use it. Because if you use it—then over time, you're going to fingerprint it, dull the teeth, and maybe even put a kink in the toothline. Oh, my.
So let's take true ownership of not just your new Bad Axe—but any other saw in your arsenal—and know how to keep it tuned up without having to ship it back to us or anyone else. The first thing you'll want to do is download our .pdf file depicted in the graphic below, 'Demystifying the Traditional Backsaw.'
 Download this file! It consists of free knowledge that will serve you well! You'll find that the .pdf file contains the key takeaways that we teach to our students who attend our saw sharpening seminars during the 1st morning of training, which orients them on how to disassemble, clean reassemble and retension a Bad Axe or any other traditional vintage backsaw.
Though you can do the same with your new Bad Axe, it's likely unnecessary that you'll need to completely break down your new Bad Axe, as long as you keep it clean and dry, but it's useful information to know regardless, because all Bad Axe saws are built in the same traditional manner in which a century-old Disston or Simonds was back in the day.
But there's more on this page than simple disassembly, cleaning & maintenance, reassembly and retensioning. The quicklinks below will also direct you to video instructionals and .pdf downloads from articles I have published in Furniture & Cabinetmaking Magazine, and Fine Woodworking.
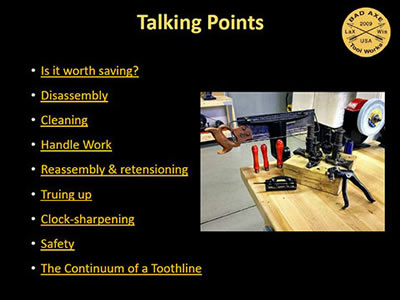
Quicklinks

The links below will allow you to jump from topic to topic, due to the length of this page.
- Perspective
- Understanding The Traditional Folded Sawback
- Retensioning
- Maintenance Supplies
- Release a frozen nut/bolt assembly on your handle
- Restore a Broken Saw Horn
- Mount, adjust and operate the Foley No. 281 Trip-Hammer set
- The Saw Doctor Will See You Now (From Furniture & Cabinetmaking Magazine)
- Sawtooth Geometry Overview
- Clock-sharpening (From Fine Woodworking Magazine)
- Selecting and Using Saw Files
- Our Saw Restoration and Sharpening Seminars
Perspective:
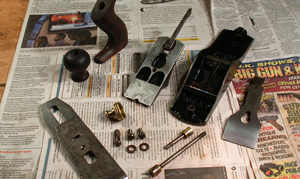 When it comes to saw maintenance, the last thing you want to do is put it up on a pedestal. Haven't we all eat some point purchased an old Stanley No. 4 off eBay, then proceeded to tear it down, fettle the parts, then put them back into working order? Well, count the parts—over 16 of them. So look at saw maintenance this way: if you can disassemble 16 parts of a hand plane, you can certainly disassemble the four components of a backsaw, consisting of the fastener set, handle, sawback and plate. So let's take the mystique out of saw maintenance. There's honestly just nothing to it. The main takeaway is knowing when to completely disassemble a saw. Let's start with the traditional folded sawback for starters.
Handle Repair:
 Release a frozen saw nut: Ever try to remove the handle on a vintage saw and there’s that one brass nut/bolt set that’s locked up, and your screwdriver just spins and spins with no result? Well here’s how you get your frozen sawnut off. Now don’t laugh, particularly if you’re from Canada. We’re talking saws, here. You’re even going to learn how to secure your saw in an easy-to-make clamp jig in the process, that can also be used to true up a sawback.
Here’s the concept in a nutshell: you’ll buy an inexpensive wooden clamp available at any home store, bore a 7/8” diameter hole, line the inside of the jaws with cork rubber you can purchase from McMaster-Carr, clamp your saw handle inside the jaws, then unscrew the frozen nut through the access hole you’ve bored. You see—the hole allows you access to the slotted head of the nut (or bolt, depending on manufacturer), and the nut/bolt on the other side of the handle is securely held fast through the tight, clamping friction the corkrubber-lined opposing jaw of the clamp exerts. Easy-peasy.
Handle Repair:
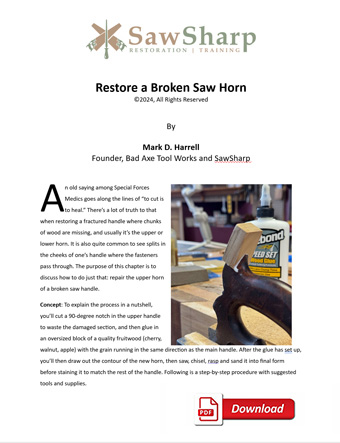 Repairing a broken saw horn: Ever drop a saw off your bench and now you have a broken horn? It's maddening. Or--have you passed up on buying a wonderful saw because one or both of the horns are missing? Then here's an easy DIY procedure where you can take matters directly in hand. Pun intended, btw. :)
The concept in a nutshell is that you'll cut a 90-degree notch in the upper handle to waste the damaged section, and then glue in an oversized block of a quality fruitwood (cherry, walnut, apple) with the grain running in the same direction as the main handle. After the glue has set up, you’ll then draw out the contour of the new horn, then saw, chisel, rasp and sand it into final form before staining it to match the rest of the handle.
Click on the image to the left to download my procedure in .pdf format along with pics and recommended tools and supplies.
Any woodworker can restore a broken saw horn in the comfort of their own shop. Have fun with this!
Handle Tightening:
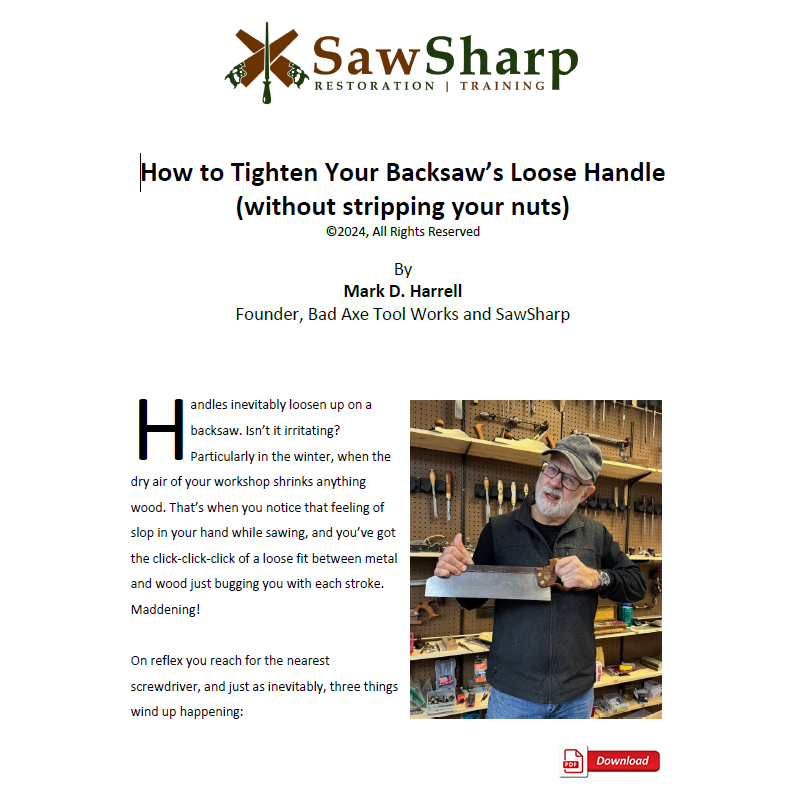 Handles inevitably loosen up on a backsaw. Isn’t it irritating? Particularly in the winter, when the dry air of your workshop shrinks anything wood. That’s when you notice that feeling of slop in your hand while sawing, and you’ve got the click-click-click of a loose fit between metal and wood just bugging you with each stroke. Maddening!
On reflex you reach for the nearest screwdriver, and just as inevitably, three things wind up happening:
Handles inevitably loosen up on a backsaw. Isn’t it irritating? Particularly in the winter, when the dry air of your workshop shrinks anything wood. That’s when you notice that feeling of slop in your hand while sawing, and you’ve got the click-click-click of a loose fit between metal and wood just bugging you with each stroke. Maddening!
On reflex you reach for the nearest screwdriver, and just as inevitably, three things wind up happening:
Click on the image above to download my procedure in .pdf format along with pics and recommended tools and supplies.
Mount, Adjust and Operate the Foley No. 281 Trip-Hammer Set
 Download this article
This article summarizes tooth placement and work holding while operating the Foley No. 281 triphammer set before saw sharpening.
This type of hammer set allows the user to exert precise control for accurate hammer-setting since you are able to hold the saw plate with both hands while activating the hammer with your foot on the treadle. The article also highlights how one can make a sloped ramp that lessens the amount of set imparted by the beveled anvil, preventing one from over-setting the tooth line.
You may download a copy of this article by clicking on the graphic above.
Be sure to check out my seminar class dates, when you decide it is time to master the complete order of operations for saw sharpening.
Download the original Foley No. 281 Manual.
Perspective:
When it comes to saw maintenance, the last thing you want to do is put it up on a pedestal. Haven't we all eat some point purchased an old Stanley No. 4 off eBay, then proceeded to tear it down, fettle the parts, then put them back into working order? Well, count the parts—over 16 of them. So look at saw maintenance this way: if you can disassemble 16 parts of a hand plane, you can certainly disassemble the four components of a backsaw, consisting of the fastener set, handle, sawback and plate. So let's take the mystique out of saw maintenance. There's honestly just nothing to it. The main takeaway is knowing when to completely disassemble a saw. Let's start with the traditional folded sawback for starters.
Understanding the Traditional Folded Sawback:
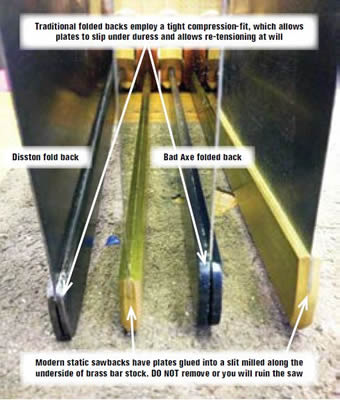
Bad Axe follows the traditional folded sawback design for securing the sawback to the spine of the plate, because that is the reason why saws still abound on eBay well over a hundred years after their manufacture. It is a little known fact that the traditional folded sawback allows for minute slippage if the plate is torqued hard in use, and also allows the user to retension the toothline at will.
Many sawmakers today will mill a slot into brass bar stock, and epoxy and/or pin the sawplate into place, making for a static sawback. While this is a perfectly serviceable method of attachment (and lowers production costs to boot), the static sawback leaves no room for error if the plate is accidentally kinked in use through poor handling. It is for this reason Bad Axe incurs the additional expense of making the traditional folded sawback that can be sprung tightly onto the spine of the sawplate, allowing it to slip under duress rather than kink.
Think of the traditional folded sawback as a ski binding that releases your ski and saves your knees in a nasty fall.
 Because a traditional folded sawback is sprung onto the spine of the plate, the plate will slip under duress before it kinks, requiring only a simple retensioning process to make arrow-straight again. It's why vintage backsaws originally made well over a century ago still proliferate eBay today—it's a time-proven design that simply works.
Static-backs are a recent invention from the past twenty years. Though they will make a sawplate rigid, the epoxy bond sealing it into the slit milled along the underside of brass bar stock will decay over time and promote a rippling effect along the toothline. And should you stress the plate through 'inelegant' saw technique, or ask more of your saw than that for which it was designed? Imagine the effect of gluing your boots onto your skis with no bindings, and you'll find out!.
Retensioning the traditional folded sawback:
You will eventually ask more of your saw than what it was designed to cut, and wind up torquing the plate in a—shall we say, 'less-than-elegant' cut. I know I do! And you will see a bit of an s-roll along the toothline. No worries—it's an extremely simple thing to straighten out with retensioning. What has happened is the plate has minutely slipped inside the sawback, rather than kinking in the cut.
You'll see how we quite easily retension one of our Bad Axe saws in the video on the left. Just follow the same procedure if/when retensioning a vintage saw, also described elsewhere on our website here.
Remember to clasp the underside of the sawback AND the plate where it enters the sawback with thumb and forefinger. Upon tapping, you'll feel the plate slip very slightly into the sawback. Your goal is to get the plate to slip no more than 1/32 per tap, and to NEVER cram the sawback down so much that the spine of the plate actually touches the inside fold of the sawback. The air gap is deliberate, allowing for a teeter-totter effect of the sawback along the spine, which equalizes clamping tension along the spine, which in turns straightens out the toothline.
Here's another video clip that demonstrates how one does the same with any other vintage saw.
Bottom line? You’re going to tap the fore and aft ends of your sawback LIGHTLY with a dead blow mallet, which redistributes the clamping tension of the sawback, which is sprung onto the spine of the plate. Unlike a static-backed saw, it’s designed to shift, thus keeping one from permanently kinking the thin sawplate.
In summary, it is the traditional folded sawback that underwrites the longevity of any saw. It is a simple, straightforward technology that has withstood the ravages of time for more than 300 years. Read more about how to bring a 100+ year old saw back to life on our website here.
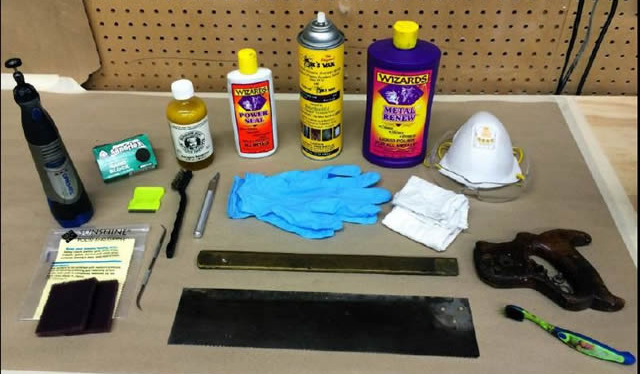
Maintenance Supplies
Keeping your saw serviceable is about 95% wiping it down and storing it in a safe, dry place. The bulk of this imperative involves refreshing the handle from time to time with wax or furniture polish, and wiping the plate down with metal protectant. That said, here are some key points to remember:
- Once you're done using your saw, wipe it free of fingerprints. The oil in your skin will print your plate, and eventually etch your print into the metal that will never go away.
- NEVER spray your plate down and simply leave it. Regardless of whether you're using WD40, Spraybees, or any other metal protectant. ALWAYS spray the plate, then wipe it down with a clean cotton cloth.
- NEVER scrub the sawback or plate of a brand new saw with any abrasive pad, like a 3M pad, Brillo pad, or steel wool. You will swirl scratches into the metal or finish if you do so. Of course, vintage saws like the one pictured below will require more aggressive measures, so do what you gotta do to get the rust and scale off. The plate will never be bright as it was the day it was made, but the intent is to mitigate friction in the cut with a clean plate. Just remember to wipe down your brand new Bad Axe with a clean t-shirt and a can of Spraybees, which does the trick.
While Bad Axe offers cleaning and maintenance supplies to keep your plate rust-free and the wood freshened up, there are many other products out there that will do the same. These are simply the products we use every day in our own shop that makes sense to us. Just click here or on the graphic below to access our supplies page.
SawSharpening Profiles

Knowing the geometry of your saws toothline is the baseline for how your saw will perform.
The purpose of this section is to provide an overview of Rip, X-Cut, and Hybrid Sawfiling Profiles.
Click on this link or the graphic above to download the .pdf deck of slides reflecting sawtooth geometry.
The Saw Doctor Will See You Now
 Editor Derek Jones of the UK's Furniture & Cabinetmaking Magazine, asked me to write a series of articles on saw maintenance and sharpening for publication in the 2014-2015 time frame, which I now present to you for reference. I've enabled each of the articles to be downloaded in .pdf format below.
Even though in all likelihood you'll never need to completely disassemble your Bad Axe, this is still good information you'll find quite applicable for maintaining any traditional backsaw, vintage or new, and I encourage you to download the .pdf files and read the articles, based on the bulleted summaries provided below:
-
 How to Tell Whether Your Vintage Saw is Worth Saving: This article covers how to assess a handsaw or backsaw, and whether or not it's worth purchasing or putting time and energy into saving. The article covers how to flex a handsaw plate to assess its tension, and how to retension the plate/back assembly of a backsaw.
-
Disassembly and Cleaning: The 2nd article of the series goes over various cleaning methods our crew employs here at Bad Axe. There are obviously a myriad of techniques one can apply; these simply illustrate the way we do it.
-
Handle Restoration and Repair: A broken handle is not the end of the world, and they are easy to repair. This article shows a straightforward step-by-step process in which one can replace the horn or solidify a crack.
-
Reassembly and Retensioning: How to retension a vintage saw on the spot and immediately ascertain whether the plate is actually kinked, or simply out of tension.
-
Hammer-Setting and Jointing: This article discusses the various types of hammer-sets, illustrating how this method is far superior to the plier or power set method.
-
The Continuum of a Toothline: Know how to select and build a nest of saws based on your requirement, rather than dogma. This article shows how pitch, gauge, size and filing all work together to deliver the kind of cutting performance your woodworking requirements dictate.
-
Clock-Sharpening (like a Bad Axe): This is the meat and potatoes approach toward saw sharpening that bypasses all the 'secret sauce' crap you'll find online—where two imperatives trump all else: hammer-setting, and sharpening to joint, using a simplified clock method.
-
Make your own saw sharpening vise: This article shows you how to make your own saw sharepning vise for less than $75 with parts easily available on-line.
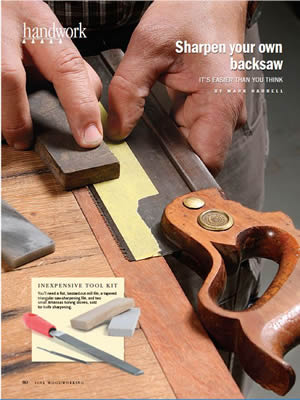
Sharpen Your Own Backsaw (It's Easier than You Think)
 Download 'Sharpen Your Own Backsaw: (It's Easier than you Think)'
Fine Woodworking's Editor Asa Christiana was kind enough to visit our shop in 2015 for a photo shoot in support of an article I wrote for the Nov-Dec 2015 issue about the Bad Axe method of what we call 'clock-sharpening,' the technique we impart to our students attending our quarterly seminars.
Frankly speaking—there's no secret sauce to it. We at Bad Axe just do the simple things really well: that is to say we hammer-set the toothline, and sharpen to joint. Everything else is superfluous. Sure, you can read the latest saw geek arcana online about precise geometric angles and which bevel is best for a particular cut, but at the end of the day, sharpening to joint with a consistently set toothline is what matters most.
The article Asa midwifed for publication with me addresses how a hammer-set toothline when dressed with an Arkansas hard stone delivers dead-nuts consistency that can be assessed with digital calipers. It also addresses how to use a simple clock method for reference when orienting your file, and how sharpening to joint is paramount, so every tooth cuts.
So pick up an old Disston No. 4 beater off eBay and have fun with it. The worst that can happen is you'll burn through a couple of files and mess up an already compromised toothline. But if you stick with it, you'll figure it out, because experience truly is the best teacher. And don't hesitate to check out our saw restoration and sharpening seminar dates—we're all veterans here at the Bad Axe workshop, and we'll line you up with a saw vise and make it real.
Selecting and Using Saw Files
 Download
Saw Files are all over the map. The bottom line is to use a file with a face that's twice the span of the sloped side of a sawtooth--and you can't go wrong.
This article covers the following:
- Reputable file manufacturers, and which files to stay away from
- File anatomy and terminology
- The difference between saw taper files and needle files
- Selecting the right-sized file for a given pitch
- Knowing when and how to deliberately size up or down with a saw file
- Crowding the toothline
- Jointing & Deburring files
- Mounting handles
- Safety Considerations
SawSharp Saw Restoration and Sharpening Seminars
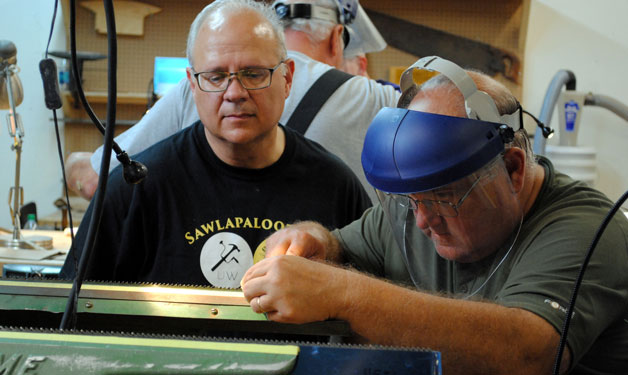
Want to take your hand and backsaw skillsup to the next level? In other words--want to learn how to sharpen your own danged saw? My best advice is to study this page, download the .pdf files, read the articles, watch the videos, and do as much as you can with them in the privacy of your own workshop. Then—come to one of my seminars here in Superior, Wisconsin where I'll put you through the paces with file in hand, and really 'get it' with how to put a fresh edge on a toothline without ganking it all up.
Any good Army veteran will tell you he's a product of the NCOs that trained him, and if you've ever been through basic training yourself, you might flash back to your rifle range days where sight picture and muscle memory turns you into a marksman inside of a week. And having worn the uniform for 28 years, my training approach is no different. I believe in training people how to file a saw for real by putting things in perspective, discarding all the precious (and confusing) crap you may have researched online (where some saw geek who has maybe sharpened one or two saws in their lives now holds forth on the various feeds), and I will push you beyond what you think you can do—rather than having you sit on your duff listening to a self-appointed expert pontificate with a series of Powerpoint slides while swilling stale coffee. I far prefer teachinig basic concepts and simplifying basic skills. Like my NCOs used to tell me when I was a young soldier--"Do the simple things well, and the rest will follow."
So--if you want to learn this skill for real, and you're willing to listen, pay attention and apply yourself--then I in turn will make double-damned sure you leave with sharpening skills under your belt. I have a track record over the past 11 years with over 60 seminars under my belt. It's not that I'm so smart--it's just that saw sharpening is firmly in my wheelhouse as the founder of Bad Axe Tool Works. You can also review my Testimonials Page from those I have instructed.
Find out more about my quarterly seminar dates, the curriculum you'll undergo, where to stay, and the most efficient way to get to my Superior, Wisconsin workshop on this website's seminar page.
Cheers! ~ Mark at SawSharp (founder, Bad Axe Tool Works)